Ok it is that time for me... time to face some realities that are not so fun to acknowledge...
#1 being quite evident. I stink at keeping up with a blog. however, it is such a therapeutic outlet that I am determined to better manage my time in order to post. My goal is to post at least once a week!...
#2.. my family has far too much "stuff"... As a stay at home wife and mother, the majority (and I mean like 99%) of the cleaning, organizing, etc falls solely on me and lemme tell you.. in this home, and family, that is a full time job on its own.
#3. baby boy #2 is totally rocked my world.. In both good and bad ways! Good, the love between my two boys is just indescribable.. however, my control of this home and our schedule etc basically has been thrown out the window. Managing two kiddos, one who has new demanding hobbies and activities (school, tee ball, friends) and the other little kiddo who is determined to simply make his own schedule that includes early bedtimes and earlier wake ups!
With those things said I have decided.. it is time... beyond time actually.. time to simplify, reorganize, re calibrate our little household, financially, physically, emotionally.
My main concern as of lately has been budget. We are a single income family. In Georgia, cost of living was much simpler, Houston, not so much. Add in cost of new activities, groceries (not bought in a commissary), and gas due to my husband horrid commute, we are coming up with new ways to stretch a buck (we as in me).
So here are my goals.. and I will be posting on them periodically
#1 simplify... there are quite a few categories within this...
Stuff-Naptime thankfully has started to happen more consistently... thus it is going to be my clean out time. Each day I will have an area in which I want to organize and simplify.. Weeding through things we do not need and then figuring out what to sell and what to toss and what to donate.
As soon as I work up a list and realistic expectation I will share it with pictures and progress shots.
#2 groceries - It is nothing new to think that as a single income family we eat at home A LOT.. and that falls solely on me.. I meal plan and attempt to keep it as organized and healthy as possible. Keeping this on budget is SOOO tough.. my goal is to simplify this. Lunches propose the worst issue for me.. I pick up J from preschool and it is so much nicer to just run through chick-fila or subway instead of just making something at home. I mean lets face it, cooking AGAIN and cleaning it up AGAIN just doesn't sound so fun right.. and those leftovers, well they are getting so old and gosh darn it I can easily talk myself into deserving a $6 meal... BUT those $6 add up quick especially when you are including a kids meal. So I am leaving a "fun lunch" to once a week (preferably on Friday after a good week of school).
We typically only eat out as a family for dinner maybe once a week. And that isn't too hard to stick to or hard on our budget. We use coupons and don't go crazy and only order water.
#3 activities - I find myself pushing myself to the limit with thinking we have to go go go go ... mainly because that is my husbands personality and I am trying to keep up, but mainly because I want my son's lives to be enriched and exciting. However, what am I raising ya know, someone who can't entertain himself? Someone who expects to go go go and can't appreciate a quiet moment? And more than anything, what am I trying to prove? That I can run myself so ragged that I literally crash?... so here is the thing.. we are choosing one activity a season, this season is it tee ball. I am cutting out a moms group and hoping to replace it with a care group from church (for my own sanity). And not put so much pressure on myself to have something to do every single day, or a play date constantly. Hopefully this will simply my stress level with regards to that!
#4 household duties..
I truly believe this will be so much easier with less "stuff"... less things to put away, less things to organize and keep clean. Also sticking to my cleaning schedule and delegating some duties more, including to J.
Ok so.. first up on this list is organizing and purging my closet..... this should be interesting and fun...
Wednesday, September 11, 2013

Wednesday, March 20, 2013
Oh... to have all the answers to all the world's problems
Here is the one thing I will always say motherhood has taught me... What you once thought you knew about parenthood BEFORE you had kids, just crumble it up, stomp on it, set it on fire and throw that s*** out... because that three year old you love so much just took every single thought you ever knew about being a parent and proved it unimportant or blatantly wrong.
To say one's life is "easy" or "without troubles" is just silly. Yes we can chose whether to focus on the positive or on the negative but each life comes with struggles and triumphs, mountains and valleys. As a self proclaimed "know it all" once when it came to how to raise children, I realize now I should have smacked myself a good one and just accepted that you live and you learn, each child/family dynamic is different.. and here is the kicker, WE ARE ALL IN THIS TOGETHER. So when condemning that mother whose child is screaming in the aisle at the grocery store while she stands there completely embarrassed and seemingly overwhelmed, think twice... because one day.. you WILL stand in those shoes too.. So give her an understanding look.. or a "we have all been there.. keep up the good work mom." Because the LAST thing she needs, is the "stare"... you know the judgmental one that could set fires in her. Build her up..even if she is wrong.. still build her up with love.. not condemnation.
Parenthood and raising our children should be a village effort. I can remember growing up and going to church and knowing that if I was bad, there would be about ten different "mamas" in hearing distance that would quickly discipline me if I needed it. I knew that they would not hold back because they got it.. the church was a village, they were there to help mold me into who I am today.. and let me tell you.. I could not be more thankful. When my mom had had enough, I know that those ladies would help out. They would lend a hand, ear, or shoulder whenever she needed. Their doors were always open to us kiddos. That village was a strong one lemme tell you. And I miss it. It was my safe place as a child. As an adult, and a mother, I am searching for that village for my children. For me as a mother, that support system is SO important. As a Christian, it is crucial to my inner most being. God calls us to love each other. And not simply the love in good times, but love in those hard times. Those times where you see someone hurting, fighting to stay above water... those are the times where we should love.
So I guess here is the end of my rant...(and believe me.. I need this statement on a daily basis as well) When feeling the urge to condemn, judge or "advise" someone in a negative way.. instead look for a way to build them up in love.. Offer a helping hand, a few words of ENCOURAGEMENT (and I mean encouragement... not something with a hidden meaning), a prayer, a common understanding etc...
As for me.. I am going to continue loving my kiddos through thick and thin.. however.. on these bad days (and yes there seem to be more of those then good with a sick 3 month old and a testy three year old).. I will chose to wallow in self pity for a few moments and then remember I am blessed.. I am loved.. and this too shall pass.... But for now.. I need a glass of wine, a huge hug from my husband and a NAP!
To say one's life is "easy" or "without troubles" is just silly. Yes we can chose whether to focus on the positive or on the negative but each life comes with struggles and triumphs, mountains and valleys. As a self proclaimed "know it all" once when it came to how to raise children, I realize now I should have smacked myself a good one and just accepted that you live and you learn, each child/family dynamic is different.. and here is the kicker, WE ARE ALL IN THIS TOGETHER. So when condemning that mother whose child is screaming in the aisle at the grocery store while she stands there completely embarrassed and seemingly overwhelmed, think twice... because one day.. you WILL stand in those shoes too.. So give her an understanding look.. or a "we have all been there.. keep up the good work mom." Because the LAST thing she needs, is the "stare"... you know the judgmental one that could set fires in her. Build her up..even if she is wrong.. still build her up with love.. not condemnation.
Parenthood and raising our children should be a village effort. I can remember growing up and going to church and knowing that if I was bad, there would be about ten different "mamas" in hearing distance that would quickly discipline me if I needed it. I knew that they would not hold back because they got it.. the church was a village, they were there to help mold me into who I am today.. and let me tell you.. I could not be more thankful. When my mom had had enough, I know that those ladies would help out. They would lend a hand, ear, or shoulder whenever she needed. Their doors were always open to us kiddos. That village was a strong one lemme tell you. And I miss it. It was my safe place as a child. As an adult, and a mother, I am searching for that village for my children. For me as a mother, that support system is SO important. As a Christian, it is crucial to my inner most being. God calls us to love each other. And not simply the love in good times, but love in those hard times. Those times where you see someone hurting, fighting to stay above water... those are the times where we should love.
So I guess here is the end of my rant...(and believe me.. I need this statement on a daily basis as well) When feeling the urge to condemn, judge or "advise" someone in a negative way.. instead look for a way to build them up in love.. Offer a helping hand, a few words of ENCOURAGEMENT (and I mean encouragement... not something with a hidden meaning), a prayer, a common understanding etc...
As for me.. I am going to continue loving my kiddos through thick and thin.. however.. on these bad days (and yes there seem to be more of those then good with a sick 3 month old and a testy three year old).. I will chose to wallow in self pity for a few moments and then remember I am blessed.. I am loved.. and this too shall pass.... But for now.. I need a glass of wine, a huge hug from my husband and a NAP!
Wednesday, March 13, 2013
Run down
As a stay at home mom of two boys (wow I really just wrote that.. TWO BOYS.. ahh) I have a tendency to feel very run down by the repetition of my day to day.. Wake up , feed baby, change diaper, clean bottles, cook breakfast, wake up three year old, make breakfast, chug coffee, play, fight with baby to go to sleep, gets him to sleep, brother wakes up baby.. etc and so on ALL DAY LONG and lets not even get into the whole running a household and trying to do errands and please my husband and get dinner on the table... Leaves VERY LITTLE time for just me! It has all compounded hard on me these past few months with Aiden being quite a difficult little man to soothe and Jaxon being such a go go go go go child. He is not used to being cramped at home all day and definitely not ok with being sent to play on his own while mommy focuses all of her attention on someone else. So needless to say my stress level has been maxed out lately..
Now some may find this as odd but oh well.. it is me and I have come to simply accept my uniqueness and Thank my wonderful Creator for giving me my gifts, but when I get stressed I clean. I am usually quite OCD anyway and well even with two kids I try my hardest to keep everything running smoothly. A unorganized mess can lead me into an anxiety attack quicker than anything else in the world. So you can only imagine the state of my house after a) moving across the country WHILE pregnant and b) having a newborn who consumes every ounce of energy you have... Needless to say at any given moment I could break down at the sight of my house and the state of my "stuff" that was strewn all over. I was utterly embarrassed if anyone came over and still am at times.
So now that my little man is consistently taking better naps IN HIS CRIB (and not on me).. and my bigger little man is still napping and going to preschool, I am slowly finding the time to organize and beautify my home again, to my standards.
Now here is the thing. I have had a lot of my friends and acquaintances ask for advice on organizing from a complete wreck... well here is my advice.. ONE STEP AT A TIME.. one item at a time.. one room, one shelf etc..
Here is my strategy when going through my home right now..
1) Access your stuff and your home..
Go through each room and establish your purpose for that room and try to envision the room how you want it with what you want in it.
2) Start sorting your piles..
Here is where it gets tricky for me... Pick a pile.. any pile.. go through it.. not organizing it per-say but instead throwing it in the room in which it belongs. By the end of your "piles" you will have one BIG MESS in each room..
3) pick a room any room
Now comes the fun part... pick a room to work on... Now start to "organize" that pile. Make mental notes of any supplies you may need to help organize it better. Baskets, bins, labels etc.
4) Divy up your budget
After figuring our supplies you will need start to prioritize them. Such as.. lets say in the kids play room.. the room that is used the MOST on a daily basis. you desperately need storage, possibly something like a big book case or shelving. Now on those shelves you may need baskets etc to make it "pretty"... but first you need the book shelf.. That would be your first purchase. Now I am NOT a person who buys ANYTHING full price. I LOVE thrift shops and I LOVE a bargain. So Try to think outside the box. Personally.. for our play room, I would have loved a huge bookcase thing from Ikea, but our budget didn't allow this.. so I settled on plastic shelving from lowes for $19.99 and it works for us for now. The key for me was to get toys up and off the floor. Oh and repurpose things.. I do it all the time.. Use an empty cereal box (painted or covered with scrapbook paper) as a way to collect coloring books etc..
5) be realistic... if you have children who are anything like my three year old.. toys are a huge problem. And picking up those toys can lead to major meltdowns, especially if they do not put them right back where you had them.. thus causing chaos.. this is where I LOVE BUCKETS.. they have these $5 plastic buckets at walmart that I loaded up on... It is much easier to get Jaxon to throw his toys in a bucket then to put them on a shelf. We make a game of it... Then while the toys may not be aesthetically displayed on a shelf, they are at least in one area off the floor!
6) Reaccess... once you have gone through and slowly purchased things to help organize (PS my favorite buys are always from Ross, TJ Maxx, Marshalls, Homegoods and even the dollartree.. never ever ever buy baskets from target, pier one, Michaels etc without checking these places first)... Go back through and re-access your organization. Sometimes you will find things that just don't work. This happens to me ALL THE TIME! I will give you an example in a bit.
7).. now here is the kicker.. the #1 thing that causes people to live in chaos again... PUT STUFF AWAY... While in my senior year in high school, I was given the opportunity to live with a deacons family in my church to finish high school because my parents were moving out of the state... While living there Mrs Helen shared with me THE BEST ADVICE EVER... and I still stick to it.. it is the "touch it once rule"... When you have something that needs to be put away... touch it one time. In other words, put it back where it belongs.. By simply moving something out of your way, instead of putting it away, you are going to be using double the time, double the energy to actually put it away when the time comes.. ... I am constantly telling my husband this. Instead of throwing that in the garage.. take the extra two seconds to put it back in the toolbox where it belongs... if instead you just throw it in the garage.. then it will join the ten other things you just threw in the garage until it becomes a big chaotic mess that you have to spend all day Saturday organizing again! .. see my point?
Here is an example of this in my household.. When we first moved in the house I had an idea of how I wanted things. How I thought things would work for us as a family of four. And as usual I was wrong and we have been tweaking things ever since. See that is the thing with organization, it is a never ending process. So on one particularly stressful day, both boys were FINALLY ASLEEP and I started on my quest even though I was exhausted and should have taken a nap.. I needed to decompress (thus organize something). I wanted my computer in a more accessible area. I wanted less toys downstairs (less to clean up quickly when someone is coming over) and I wanted my arts and crafts stuff downstairs so I have it close to work on something fun with Jaxon when/if aiden is napping!... So I set to work.. made piles of stuff.. organized and jotted down what I needed..
I ran to my favorite Ross... grabbed beautiful baskets, set them up and then bam :: Arts and crafts bookshelf:: Plastic bins were from dollar tree.. total for the transformation was like maybe $50... the baskets on this shelf were $8.99 and $9.99 from Ross...

Now some may find this as odd but oh well.. it is me and I have come to simply accept my uniqueness and Thank my wonderful Creator for giving me my gifts, but when I get stressed I clean. I am usually quite OCD anyway and well even with two kids I try my hardest to keep everything running smoothly. A unorganized mess can lead me into an anxiety attack quicker than anything else in the world. So you can only imagine the state of my house after a) moving across the country WHILE pregnant and b) having a newborn who consumes every ounce of energy you have... Needless to say at any given moment I could break down at the sight of my house and the state of my "stuff" that was strewn all over. I was utterly embarrassed if anyone came over and still am at times.
So now that my little man is consistently taking better naps IN HIS CRIB (and not on me).. and my bigger little man is still napping and going to preschool, I am slowly finding the time to organize and beautify my home again, to my standards.
Now here is the thing. I have had a lot of my friends and acquaintances ask for advice on organizing from a complete wreck... well here is my advice.. ONE STEP AT A TIME.. one item at a time.. one room, one shelf etc..
Here is my strategy when going through my home right now..
1) Access your stuff and your home..
Go through each room and establish your purpose for that room and try to envision the room how you want it with what you want in it.
2) Start sorting your piles..
Here is where it gets tricky for me... Pick a pile.. any pile.. go through it.. not organizing it per-say but instead throwing it in the room in which it belongs. By the end of your "piles" you will have one BIG MESS in each room..
3) pick a room any room
Now comes the fun part... pick a room to work on... Now start to "organize" that pile. Make mental notes of any supplies you may need to help organize it better. Baskets, bins, labels etc.
4) Divy up your budget
After figuring our supplies you will need start to prioritize them. Such as.. lets say in the kids play room.. the room that is used the MOST on a daily basis. you desperately need storage, possibly something like a big book case or shelving. Now on those shelves you may need baskets etc to make it "pretty"... but first you need the book shelf.. That would be your first purchase. Now I am NOT a person who buys ANYTHING full price. I LOVE thrift shops and I LOVE a bargain. So Try to think outside the box. Personally.. for our play room, I would have loved a huge bookcase thing from Ikea, but our budget didn't allow this.. so I settled on plastic shelving from lowes for $19.99 and it works for us for now. The key for me was to get toys up and off the floor. Oh and repurpose things.. I do it all the time.. Use an empty cereal box (painted or covered with scrapbook paper) as a way to collect coloring books etc..
5) be realistic... if you have children who are anything like my three year old.. toys are a huge problem. And picking up those toys can lead to major meltdowns, especially if they do not put them right back where you had them.. thus causing chaos.. this is where I LOVE BUCKETS.. they have these $5 plastic buckets at walmart that I loaded up on... It is much easier to get Jaxon to throw his toys in a bucket then to put them on a shelf. We make a game of it... Then while the toys may not be aesthetically displayed on a shelf, they are at least in one area off the floor!
6) Reaccess... once you have gone through and slowly purchased things to help organize (PS my favorite buys are always from Ross, TJ Maxx, Marshalls, Homegoods and even the dollartree.. never ever ever buy baskets from target, pier one, Michaels etc without checking these places first)... Go back through and re-access your organization. Sometimes you will find things that just don't work. This happens to me ALL THE TIME! I will give you an example in a bit.
7).. now here is the kicker.. the #1 thing that causes people to live in chaos again... PUT STUFF AWAY... While in my senior year in high school, I was given the opportunity to live with a deacons family in my church to finish high school because my parents were moving out of the state... While living there Mrs Helen shared with me THE BEST ADVICE EVER... and I still stick to it.. it is the "touch it once rule"... When you have something that needs to be put away... touch it one time. In other words, put it back where it belongs.. By simply moving something out of your way, instead of putting it away, you are going to be using double the time, double the energy to actually put it away when the time comes.. ... I am constantly telling my husband this. Instead of throwing that in the garage.. take the extra two seconds to put it back in the toolbox where it belongs... if instead you just throw it in the garage.. then it will join the ten other things you just threw in the garage until it becomes a big chaotic mess that you have to spend all day Saturday organizing again! .. see my point?
Here is an example of this in my household.. When we first moved in the house I had an idea of how I wanted things. How I thought things would work for us as a family of four. And as usual I was wrong and we have been tweaking things ever since. See that is the thing with organization, it is a never ending process. So on one particularly stressful day, both boys were FINALLY ASLEEP and I started on my quest even though I was exhausted and should have taken a nap.. I needed to decompress (thus organize something). I wanted my computer in a more accessible area. I wanted less toys downstairs (less to clean up quickly when someone is coming over) and I wanted my arts and crafts stuff downstairs so I have it close to work on something fun with Jaxon when/if aiden is napping!... So I set to work.. made piles of stuff.. organized and jotted down what I needed..
I ran to my favorite Ross... grabbed beautiful baskets, set them up and then bam :: Arts and crafts bookshelf:: Plastic bins were from dollar tree.. total for the transformation was like maybe $50... the baskets on this shelf were $8.99 and $9.99 from Ross...

It is perfect for what I needed it.. I was able to simplify my life by organizing things into each bin!
Oh that was the other thing that helps.. SIMPLIFY! We all tend to gather things.. the ONLY positive thing I can say about moving is the ability to simplify every few years. Having to pack and unpack and reorganize definitely makes you declutter on a normal basis with the military.
I wish I had before and after shots of my recent organization marathons but I keep forgetting (I get into gotta get it done mode)...
And believe me.. it all goes to pot a lot too and I have redo it all. It happens.. TO EVERYONE.. And I am sure we all get embarrassed over how our homes look.. Lord knows if someone were to step into mine right now they would wonder what the heck people were asking me for advice for haha... (my floors are a disaster, toys everywhere, dishes all over the kitchen, bathrooms need scrubbing etc)... but I promise, once you make it a habit to organize, maybe it will be fun for you too, and help destress your life a little..
Wednesday, March 6, 2013
Oh where Oh where has my little blogger gone... oh where oh where could she be??
Oh goodness. I honestly have NO clue where to even begin this post other than to say our life has been anything but calm the past few months. My last post, showing the canvas photo project, was probably my last DIY project that I have had time to even think about!
My little man Aiden made his arrival on Christmas Eve. It was quite a funny story and quick easy labor believe it or not. God may have not blessed me with the easiest babies or pregnancies but man he blessed me with quick worry free labor and delivery with both of my boys. I sat there Christmas eve morning just hanging out on the couch after taking Jaxon to the doctor for a horrid cold that wouldn't let up. Jaxon was outside with Alan and I had been having pains all morning but attributed it to moving around our living room by myself.. yea nesting mode hits an OCD prego REALLY HARD. So I took a rest on the couch while watching pioneer woman. After about an hour I decided to actually time my "pains." See these "pains" were never really felt with Jaxon. I did not notice I was in labor the morning of our induction with him. When I arrived at the hospital they "informed" me I was in labor already... so this whole labor pains thing was new to me without the good ol' pitocin. well sure enough.. they were about 7 minutes apart. As I laid there by myself, my boys out and about and my mother had run to the grocery store to gather supplies for a Christmas day lunch, I worried about whether I was being "that prego" who always thought she was in labor only to be turned away. So I called the doctor anyway. They said to be safe to come on in, considering I was 39 weeks. I gathered up my things, grabbed Alan and called my mom to come on back so she could care for Jaxon. Alan and I reluctantly went to the hospital with bags in tow.
Now here is the funny part. As we were arriving the contractions were getting stronger. I knew they were real now. We go in the hospital, completely lost because we weren't able to go to the class that shows you where everything is. This hospital is a tiny catholic hospital and all desk attendants are old and volunteers. Well it must have been our lucky day because we walked and there sat two people on their first day as volunteers. My husband, always the jokster in stressful situations, asked them, "so where do we go to have a baby" in a very sarcastic tone. The people just stared blankly at us for a moment. They had no idea... So here was my thought process, while standing there contracting every 5 minutes or so, knowing good and well that another contraction was on its way in like 2 minutes, shouldn't the general floorplan of the hospital be one of the FIRST things covered when assigning volunteers to the WELCOME DESK!They quickly scrambled to find the number to someone who could help. Then they couldn't figure out how to use the phone (yet another DUH should have been on the "how to be a hospital volunteer" requirements)... Well by then the contraction was coming. My husband, poor thing, stood there calm as could be... I on the other hand, clearly on edge, walked right past them and proclaimed I could not wait around for them.. that we would have to walk and find it on our own.....
So up the elevator we went... turns out it was on the second floor right above where we were... literally to the left of the elevator. We waltzed in and declared I was in labor and quickly we were shown a room. Quick change into a gown and the nerves started as the nurse hooked me up to every wire in the room. Now here is the annoying part. As soon as the hooks everything up the contractions STOP.. She did a quick check, assured me I was only like 1-2 centimeters and that since the contractions stopped it was my choice whether to stay or to go. If I stayed they would just go ahead and induce, which I was scheduled for two days later anyway. Or I could go home and just wait it out. We thought about it long and hard and decided to go just on home. As she was unhooking me from everything and about to take off my wristbands, she decided to go ahead and check me one more time... and well.. I progressed to a 5 in less that 20 minutes... So we stayed.. the rest was a whirl wind. I arrived at the hospital at 2pm and Aiden was born at 5:32. Epidural didn't work as well as with Jaxon, so while I was in much more pain, it was easier to push.
After I felt amazing. No tearing, No stitches. No nothing. Crazy!
Well the next few weeks have been complete chaos. Nursing turned out to be A LOT more challenging than I was praying it would be. Two stints of mastitis, thrush, latching issues, engorgement, and finally a milk protein allergy. But we are finally doing well. Aiden is sleeping better and eating like a champ and while he is extremely attached to me, his little personality is coming out more and more.
Adapting to a family of 4 has been terribly difficult for me though. The mommy guilt of throwing Jaxon's entire world for a loop is a hard pill to swallow. The first month he did great. However, the realization that mommy can't simply jump when he needs something is very difficult for him to understand and the acting out has been in full force lately.
I am continuing to work at it daily and I am SO thankful for preschool those precious three mornings a week.
This blog is obviously lower on my priority list but I have SO many things I cannot wait to write about.
My recipes are forming out of necessity for QUICK fix meals with the use of only one hand (baby in the other).. and ones that Jaxon can help with.
My DIY things are definitely on hold until I can get these two on the same consistent nap schedule (and some time to myself as well as sleep)
As far as organizational tips. Oh I cannot wait to get this one started. I honestly feel the key to my sanity is organization and function. With this move, which was SO unorganized and wild, I have come to appreciate my zany need for things to be neat and tidy, and now my husband understands even more so why I feel that way. My kiddos will one day, but for now it is a battle daily to keep the house even remotely mess free! Simplicity, I am learning that art!
So please bare with me as I learn to manage my time, energy and priorities!
My little man Aiden made his arrival on Christmas Eve. It was quite a funny story and quick easy labor believe it or not. God may have not blessed me with the easiest babies or pregnancies but man he blessed me with quick worry free labor and delivery with both of my boys. I sat there Christmas eve morning just hanging out on the couch after taking Jaxon to the doctor for a horrid cold that wouldn't let up. Jaxon was outside with Alan and I had been having pains all morning but attributed it to moving around our living room by myself.. yea nesting mode hits an OCD prego REALLY HARD. So I took a rest on the couch while watching pioneer woman. After about an hour I decided to actually time my "pains." See these "pains" were never really felt with Jaxon. I did not notice I was in labor the morning of our induction with him. When I arrived at the hospital they "informed" me I was in labor already... so this whole labor pains thing was new to me without the good ol' pitocin. well sure enough.. they were about 7 minutes apart. As I laid there by myself, my boys out and about and my mother had run to the grocery store to gather supplies for a Christmas day lunch, I worried about whether I was being "that prego" who always thought she was in labor only to be turned away. So I called the doctor anyway. They said to be safe to come on in, considering I was 39 weeks. I gathered up my things, grabbed Alan and called my mom to come on back so she could care for Jaxon. Alan and I reluctantly went to the hospital with bags in tow.
Now here is the funny part. As we were arriving the contractions were getting stronger. I knew they were real now. We go in the hospital, completely lost because we weren't able to go to the class that shows you where everything is. This hospital is a tiny catholic hospital and all desk attendants are old and volunteers. Well it must have been our lucky day because we walked and there sat two people on their first day as volunteers. My husband, always the jokster in stressful situations, asked them, "so where do we go to have a baby" in a very sarcastic tone. The people just stared blankly at us for a moment. They had no idea... So here was my thought process, while standing there contracting every 5 minutes or so, knowing good and well that another contraction was on its way in like 2 minutes, shouldn't the general floorplan of the hospital be one of the FIRST things covered when assigning volunteers to the WELCOME DESK!They quickly scrambled to find the number to someone who could help. Then they couldn't figure out how to use the phone (yet another DUH should have been on the "how to be a hospital volunteer" requirements)... Well by then the contraction was coming. My husband, poor thing, stood there calm as could be... I on the other hand, clearly on edge, walked right past them and proclaimed I could not wait around for them.. that we would have to walk and find it on our own.....
So up the elevator we went... turns out it was on the second floor right above where we were... literally to the left of the elevator. We waltzed in and declared I was in labor and quickly we were shown a room. Quick change into a gown and the nerves started as the nurse hooked me up to every wire in the room. Now here is the annoying part. As soon as the hooks everything up the contractions STOP.. She did a quick check, assured me I was only like 1-2 centimeters and that since the contractions stopped it was my choice whether to stay or to go. If I stayed they would just go ahead and induce, which I was scheduled for two days later anyway. Or I could go home and just wait it out. We thought about it long and hard and decided to go just on home. As she was unhooking me from everything and about to take off my wristbands, she decided to go ahead and check me one more time... and well.. I progressed to a 5 in less that 20 minutes... So we stayed.. the rest was a whirl wind. I arrived at the hospital at 2pm and Aiden was born at 5:32. Epidural didn't work as well as with Jaxon, so while I was in much more pain, it was easier to push.
After I felt amazing. No tearing, No stitches. No nothing. Crazy!
Well the next few weeks have been complete chaos. Nursing turned out to be A LOT more challenging than I was praying it would be. Two stints of mastitis, thrush, latching issues, engorgement, and finally a milk protein allergy. But we are finally doing well. Aiden is sleeping better and eating like a champ and while he is extremely attached to me, his little personality is coming out more and more.
Adapting to a family of 4 has been terribly difficult for me though. The mommy guilt of throwing Jaxon's entire world for a loop is a hard pill to swallow. The first month he did great. However, the realization that mommy can't simply jump when he needs something is very difficult for him to understand and the acting out has been in full force lately.
I am continuing to work at it daily and I am SO thankful for preschool those precious three mornings a week.
This blog is obviously lower on my priority list but I have SO many things I cannot wait to write about.
My recipes are forming out of necessity for QUICK fix meals with the use of only one hand (baby in the other).. and ones that Jaxon can help with.
My DIY things are definitely on hold until I can get these two on the same consistent nap schedule (and some time to myself as well as sleep)
As far as organizational tips. Oh I cannot wait to get this one started. I honestly feel the key to my sanity is organization and function. With this move, which was SO unorganized and wild, I have come to appreciate my zany need for things to be neat and tidy, and now my husband understands even more so why I feel that way. My kiddos will one day, but for now it is a battle daily to keep the house even remotely mess free! Simplicity, I am learning that art!
So please bare with me as I learn to manage my time, energy and priorities!
Friday, December 7, 2012
OH so many things to write, oh so little time
I am popping in for a quick tutorial on something I have been wanting to try but I haven't had the walls to hang them on... DIY canvas prints.
I cannot fathom spending the money on real "canvas prints" the ones that look professional and are actually printed on canvas and stretched around a frame... SO of course Pinterest inspired me to try my own. I found numerous tutorials on how to do it myself. All of which made it seem SO easy and quick and offered very limited guidelines or tips but I figured I got the jest of it so why not give it a whirl.
Gather all of your supplies first, I recommend doing one at a time until you get it the way you want it though... so keep that in mind before you go buy a billion different canvases and prints.
Here is a run down of what I used :
8 x 10 print ($1.49 at Sams club)
8 x 10 canvas (2 pk at $3.99 hobby lobby w 40% off coupon = $2.40 for 2.. so $1.20 for one)
Modge Podge, Matte finish (I already had this on hand but you can find it at a local craft store for about $7.99.. try to use a coupon with it)
black acrylic paint (already had on hand but usually runs around $2)
paint brush or sponge (already had on hand also but super cheap for a set $1)
exacto knife/razor blade
baggie (x2 to store paint brushes in)
paper plate (so you are not double dipping in modge podge or paint)
 |
| just some of the supplies ... and yes I had to do mine standing at the counter because sitting with his big ol' 9 month prego belly is just too tough! |
Go ahead and paint around your canvas. You do not need to limit yourself to just black. Depending on the tone of the photo in which you are using, you can leave it white or even change it up and use a color out of the photo. I chose black. I like the shadow effect it offers. With the black, I chose to do two coats, but I did them in stages. So to begin... just do a good coat of black. Make sure you paint all edges and about an inch into the canvas too.
Once the paint is COMPLETELY DRY... Now listen.. I don't mean dry so it doesn't come off your fingers, I mean completely dry. I made this mistake and ended up with the modge podge pulling the paint off the edges.. a MESS, completely fixable but still a mess! Ended up having to repaint it all again! So don't be like me.. start the project at night maybe and then in the morning when it is really dry continue. (also quick easy tip for overall painting... when you know you are going to working with the same color and paint brush again, simply seal the wet paint brush in a ziplock baggie until you need to use it again. It keeps it from drying out and keeps you from the headache of washing it all the time in between coats... Same goes for painting a room, store the wet roller in a bag!)


 |
| FYI... if you knick the canvas (don't go all killer on it) you will have that second chance with the black paint to cover over any imperfections left by the razor blade! |
Push the "bubbles out" and firmly press down on the canvas to adhere all the glue to the photo flip over to dry
So let that dry for probably about 30 minutes. Modge Podge works quick so it dries pretty well (as long as you didn't go all crazy and use tons of it) Once it is dry, turn canvas picture side down, on a very clean surface (I use a clean cutting board/plastic, that I use for alot of my crafting). Use the razor to cut the excess around the canvas.

Now here is where I got frustrated. One of the tutorials I read told me to just cut and then modge podge over... well once I cut the excess around the print, I discovered the white of the photo paper showed quite drastically against the black border. So I was left with a bit of a dilemma... I knew I didn't like how it looked, but I was a bit terrified to paint the edges again. But I decided it really needed it because on my first one I didn't let dry all the way and I needed to cover the spots where the modge podge and paint didn't agree... So I took out my sponge brush and just lightly brushed on another coat, making sure to also hit the edges of the photo paper.... and guess what.. I LOVED IT! It sort of "set" the photo to the canvas where I had painted it black. SO this is where that second coat of black for the edges of the canvas comes into play.

no black - white photo paper showing through, with some modge podge

clean black surface, tying the picture into the canvas with the black!
Now once all that is dried well, grab your baggied modge podge brush and now comes the scary part.. modge podge OVER the print! Take your brush, start with the edges, go around the print brushing towards the edge to "seal" the edge of the print to the canvas. Do not freak out like I did when you can obviously see the modge podge as you are brushing. It truly does dry clear. And infact, those brush marks you are seeing, you want them! When it does dry completely the brush strokes give the photo character to make it seem more like a real canvas print not the smooth glass of photo paper. Now once you have completed the edges, go ahead and modge podge starting from the top all the way down to the bottom in a thin layer. Leave it to dry..

 |
| you want that random brush marks! Believe me it dries clear! |

Tip - smooth out the modge podge around the picture well!
You don't want clumps!
When you come back you will see the white has disappeared and you are left with your canvas! Neat huh And super easy. So far I have only done these 8 x 10 ones. I am itching to try larger prints but the larger you go the more expensive the canvas and the photo print so I wanted to try these first. Also after doing color vs black and white I prefer the black and white. The color you can tell is a photo print onto a canvas upon closer inspection, but with the black and white it almost enhances the lighter tones of the photo.
Black and white canvas print finish -
 |
| *** Notice the black carrying from the print to the canvas.. this is why I like the black and white print using this technique better*** |
 |
| ** this is completely dry! See the awesome brush strokes the matte Modge Podge leaves! Gives it that real canvas texture! *** |
So have fun you guys!
Thursday, October 4, 2012
My sanity binder
*****Disclaimer: I am very aware of how "dangerous" it can be to have all of your personal important information gathered in one place. However, I am also adamant on the use of a safe within the home, or even a safety deposit box within a bank. This safe must be one in which is too heavy for a thief to simply pick up and take out of your house, also it can even be bolted to the floor, cabinet, etc in order to insure it cannot be moved. This binder is always secured in our safe unless it is in my hands in use then it is promptly returned to the safe considering its contents. So please, if you do think of incorporating this organizational system into your household, be sure to consider your level of responsibility with regards to putting it back into a secure environment where it will be kept away from insecure eyes. If you are not sure you will be able to secure the binder every time you use it, keep the important documents and information out of it and simply use it as a general information tool.
A few months ago my dear friend Karen showed me a website that has thoroughly inspired me daily on my quest to remain organized, and continue to build on my organization obsession to help my household run smoothly. Jen at I heart Organizing is a girl after my own heart. She is a mother and business owner. She relies on her organizational skills to help save money and keep as much dysfunction out of their everyday as possible. One of the initial posts I read was regarding her household binder. Within this binder she explained she kept important information that helped her household run smoothly. She has a few different ones such a home maintenance, bills, medical etc. I have been meaning to take this as the inspiration to make my own that works for my family.
First let me proclaim my reasoning for taking on this task::::
1) Within the craziness I call my household, I am very very type A personality and my husband in VERY type B.. and throw in a wild toddler who constantly has us on our toes, things get misplaced, forgotten and misconstrued. I needed something that was easy access and organized.
2) With a military family, we move ALOT... by alot I mean for us it has been every 1-2 years lately, with an entire new region every 4 years. So while i have kept accurate records in files in my computer desk drawer, I needed something a little easier to handle in the midst of a move.
3) Ever sifted through a filing cabinet, then found the file you wanted only to discover the paper you are looking for must have fallen through the file or gotten filed in the wrong order thus making it impossible to quickly grab what you need and go... Yea.. happened to us ALL THE TIME! Being type A I CANNOT STAND not being able to find something. It drives me nuts. I have always adopted the concept "A place for everything and everything in its place" thus keeping the mystery out of where that birth certificate went, or the bill from 3 months ago that I need to compare to the bill from this month etc... properly organized and store and put back where it belongs THE FIRST TIME allows dysfunction to morph into a functional system.
There were other little things within those reasons too but those were the most important. So after my friend Karen got on point and got her household binder completed and bragged about how much easier it was to keep things together, I knew that with the extra time I had on my hands after completing my psychology degree (yep whoopie.. go me) and with Jaxon in school and my husband here before heading to VA, there was no better time then to get my butt in gear and get mine made. I knew initially it would be time consuming, mainly because I am a perfectionist and I want it done like yesterday so I knew I would work until it was close to perfect as possible. So.... If you are like me.. allow yourself an entire Saturday or weekend to complete it.. if you are more laid back.. just take it a step at a time over time and let it build. I know mine will be forever changing and adapting but that is part of the fun!
1) First was planning it. I did some research into what other people had used in theirs. I adapted that to what works for my family right now. I began simply brainstorming about what information would be nice to have readily available at my finger tips vs having to constantly look things up. I began with these following Headers and then within those I knew I would create subtitles. This is what mine ended up being (let me also advise these are FOREVER changing and I have ALL templates on my computer organized within a household binder file so I can easily go back and reprint to change.. more on that in a minute)
A) Home
Home Maintenance Quick Reference Page
Home Maintenance Charts (both weekly "chores" and monthly and then yearly, separated into seasons)
Insurance information (for us it is renters for now)
Cell phone information
***this will expand as we are soon to buy our first house.. continued is what I suspect I will include after buying our home***
Electric Company info
Water Company info
Home Owner's association info
Cable/satellite info
Home Phone info
Alarm Company info
Yard maintenance info
etc (the key is to personalize this to your personal needs within your home.. anything involving the actual home will go in this heading)
B) Finance
Finance Quick Reference
Monthly reoccurring expenses quick check sheet
Monthly Budget Builder
Checks deposited (our banking is solely electronic so once we scan/deposit a check, I keep the checks stored here just in case any discrepancies arise)
*** I plan on expanding this to keep up with our monthly expenses and spending once we move to our permanent home as well *****
C) Automotive
Cars quick reference
Car 1 (camry) info
maintenance log
any maintenance paperwork
Car 2 (Silverado) info
maintenance log
any maintenance paperwork
Car insurance info
Vehicle History (to include cars we have had in the past)
D) Medical (this was very important to me to keep up with all of mine and Jaxon's medical visits within the past few years)
Medical Quick Reference
Child #1 Immunization reports & Medical visit history
Child # 2 Immunization reports and Medical visit history
My medical history
E) School
Child #1 School info by grade
Child #2 School info by grade
Alan school info by grade
** this will expand to mine whenever I go back for my masters**
E) Important Documents
File for each of us to properly store SS card, Birth Certificate, Marriage Record, Power of Attorney etc
F) Various folder
Online Passwords record
Previous Residences information
Important events and dates
So once I got all these things written down I knew I could go shop for my supplies. I simply went to staples and target (PS anyone realize staples is INCREDIBLY overpriced!).. I knew I needed:

*nice heavy duty binder (started with a 2inch.. might expand to a 3 once we get to TX)
*Dividers with pockets
*tabs to create subheaders
*page protectors
*a plastic folder thing to label for "to be filed or recorded" (the blue thing)
*document folders (for important doc section.. page protectors allow sheets or documents to potentially fly out of the top of it so I prefer to store them in an enclosed folder with a snap or velco to secure the documents more soundly)
*pencil pouch
*vis-a-vis pens (to be able to create my monthly budget then simply wipe it off)
*laminating equipment (my mom owned one of these already)
*a note pad small enough to fit in the binder for any brainstorming or notes (not pictured)
So for about $25 I had everything I needed.. of course spending a little more for the fun colors etc because I wanted it to be something I wanted to see.. plus I love color coordinating anything!
Next came the time consuming part. Creating the templates on the computer. I knew I could pay someone money for some they already created but possibly they would be personalized well to my liking, so being frugal, I created my own. They are extremely simple and does not show any fancy graphic design talent but it gets the job done! I will go by my headings and share what I used as my templates (however, for the life of me I cannot figure out how to share with you the actual template.. So either a) make your own,or b) email me and I can email you the file!

For each any ever section (sometimes even subsections) I made a quick reference sheet. These are for any phone numbers, log in information, etc that would be something I would want to keep log of. It makes it easy to just turn to that section and grab instead of looking through other areas. I cannot show you all of mine because well, I already filled them out but as it shows in the bottom section of this post I have a contents page.. any questions just let me know and I will promptly email you the template you might want to have a look at!

As you can see these are in page protectors, thus I can simply remove and fill out as time goes on, or reprint and then fill out again if the information changes!

This is the weekly chore log. I LIVE by this in my own home. Every day I have a task, nothing major, but every day a certain area of the house gets cleaned, instead of waiting until the last minute and cramming it into a Saturday where I would MUCH rather be spending time playing with my son or out on a family outing. Such as in GA Mondays were Kitchen days, scrub appliances, wipe cabinets, move and wipe counters etc. Tuesdays were Floors, mop, scrub floors all over the house. Wednesdays were bathrooms, Thursdays were windows/doors and dusting
Fridays were toys, reorganize and clean any toys
Saturday were devoted to family and Sundays were laundry days. Of course there are things in between you have to do, especially if people were coming over, but keeping it simple and not overwhelming to all out field day the house in one day kept things much more manageable. Everyday of course there were tasks too, dishes, vacuum, make beds etc...
This is also laminated so I can simply write on them in vis-a-vis and wipe off when there needs to be a change!

I can already tell this is going to be a life saver in our new home. Keeping track of those little things. When you changed the smoke detector last, when the air filters need to be changed, as well as seasonal cleanings that need to happen, AC check up etc..

As you can tell these are laminated. Thus I can write on them with a vis-a-vis and wipe them off every year to be refilled out next year.
FINANCE
Here is the major reason I made this binder. I needed a way to keep up with account #'s, Log in info, expenses etc.. so that instead of rummaging through the file drawer for what we spent on whatever a few months ago I can look here! And instead of having to change or look up password after password etc I can simply go to the safe, pull this out and find it.. As can my husband!
here are a few pages from mine
 |
| Laminated for filling out each month |

Automotive:
This is more for my benefit. I needed an area to keep track of previous vehicles as well as car maintenance instead of keeping the papers in the glove box where they can easily be lost. Also to keep track of when the air filter was changed last or the tires rotated etc.

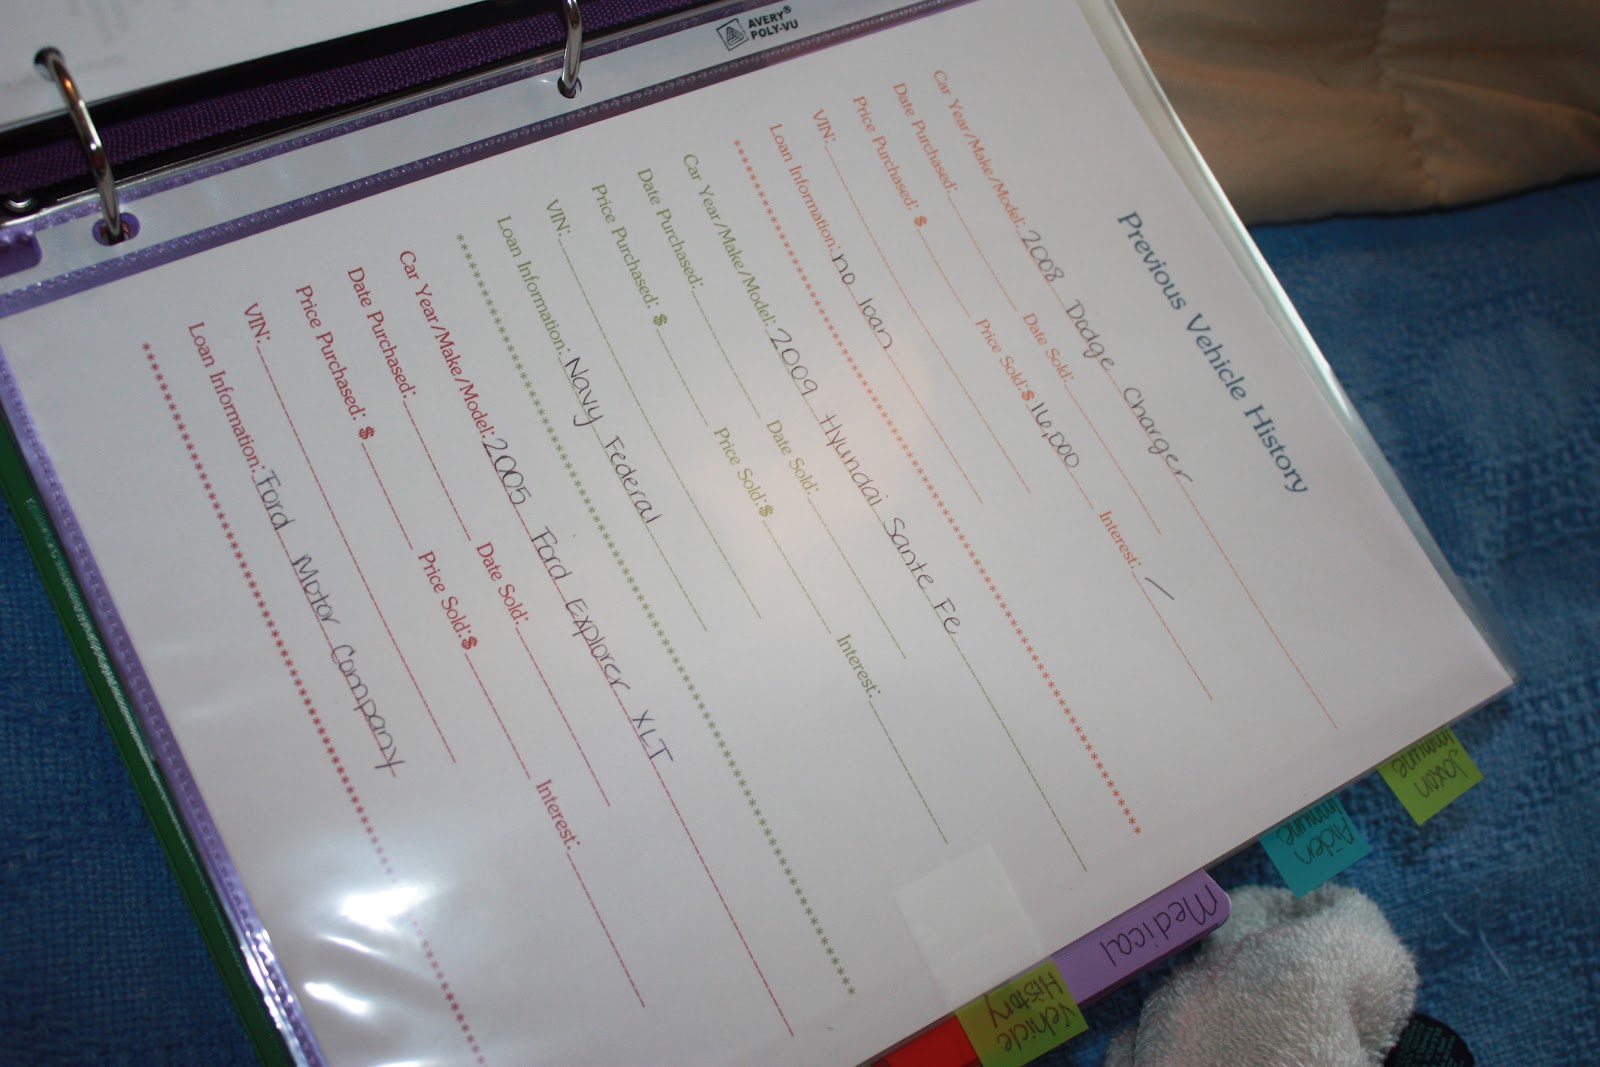
Medical
This was self explanatory. This area helps me to keep track of Jaxon's, mine and baby #2's current and previous doctor visits. And, I reluctantly admit, to keep track better of medications we have been prescribed or diagnosis's etc. With two kiddos I know this will come in handy!


School
This pertains more toward Jaxon and Alan at the moment. I wanted somewhere to keep track of Jaxon's School history. Considering we will move alot etc, I wanted somewhere to keep track of his teachers etc. I have a separate file box for each year he goes to school with pictures, work etc.. but this is just for quick reference!

Various
This section I have quite a few things in. I have previous residency information page in there just because I don't want it junking up my home section. For a military family, this is actually very helpful when trying to remember certain addresses from back in the day for background checks, applications etc.
I also include in this section any pet information. For Roxie I keep her most recent vaccination records, her vet information as well as her homelink information if she were ever lost. I have already been able to use this section and it was SO much nicer then shuffling through files.


My completed Binder! Yes it is quite thick, mainly from the important document folders section. I plan on looking for some less bulky options in the future.
Here is a run down of the outline of my binder::::
A) Home
1) Home
Maintenance Quick Reference Page
2) Laminated
Weekly Chore Chart
3) Laminated
Home Maintenance Check List
4) Renters
Insurance Quick Reference
5) Renters
Insurance Policy
6) Verizon
Wireless Quick Reference
7) Verizon
Wireless Contract
B)Finance
1) Finance
Quick Reference
2) Monthly
Reoccurring Expenses
3) Build a
budget Worksheet
4) file
folder with checks deposited
5) Each Bill
Expense record
C)Automotive
1) Car Quick
Reference
2) Toyota
Maintenance Log
-copy of registration
-all maintenance paperwork
-purchasing paperwork
3)Chevy
Maintenance Log
-copy
of registration
-all maintenance paperwork
-purchasing paperwork
4) Vehicle
History
D)Medical
1) Medical
Quick Reference
2) Doctor
Appointment Records (for each member)
3) Well Baby
Check up Record (for each child)
4)Immunization
record (for each child)
E) School
1) School
info (for each child)
2) Alan
school info
F)Important Documents
1) Folder
for Becky Documents
-SS card,
Birth Certificate, Voter Registration Card
2) Folder
for Alan Documents
-SS
Card, Birth Certificate
3) Folder
for Jaxon Documents
-SS
Card, Birth Certificate
4) Folder
for Baby A Documents
5) Folder
for Jaxon savings bonds
6) Folder
for Various
-marriage
license, power of attorney
F)Various
-Pet
information sheet
-Vaccination
records
-Previous
Residences
-Random Log
in passwords etc
Helpful Hints:
1) This is NOT to be a substitution fro your file folder. This just a quick reference, easy grab. Now here is my two cents on file folders also. I have one yes, mostly for alan's awards, Jaxon's school artwork etc.. however, keeping things such as bills, tax info etc... It can be easily scanned into a computer, and stored on a hard drive separate from the computer. The old school in us wants everything on paper.. These days almost all bills etc can be found online somewhere and keeping a copy of it on a hard drive takes up MUCH less room and is so easily stored and organized. Also to think of is the fact that in an emergency, a hard drive is much easier to grab than a huge filing cabinet. Keep it minimum. I have a file box for Jaxon's school (minimal.. separated by each year), a box for Alan's military stuff (mainly because he keeps it so unorganized and wild I cannot stand to look in it.. so it is his space). my household binder. then an external harddrive with important bill paperwork stored on it. Our Tax info is stored online as well as on my harddrive too.. Just print and there ya go if you ever need copies!
2). Personalize... I like to have templates and write things in. If you have terrible handwriting, feel free to type things in and just change them and reprint as you go! Simple enough. Add a little here and there. It will never be "perfect" or compeleted. Life, especially ours, is ALWAYS changing so will my household binder!
3) Use your to be filed folder well, but make a point to sit down at least once a week to organize or put in information. This too could easily become a wild mess if you just throw things in the binder.. Remember it is supposed to help you not hinder you. so while piling up papers in your "to be filed" folder is easy in a pinch, it is not a final fix.. you MUST keep up with it!
4).. If you remove something from the binder, IE the SS card or a contract . keep note of it on your small note pad as to where you are taking it and when you took it. And of course ALWAYS return it as quickly as you can as to not misplace it!
5)... Probably one of the most important for personal identity .. NEVER EVER remove the entire binder from your house (if it contains private information. That includes vacations, quick trips etc... Remove what you might need and put it in a separate folder etc to carry with you (marking what you took etc)... Taking all the info in my binder out of my house could propose a HUGE issue if ever I were to misplace it while out and about. Of course when moving that is a different story.. leave it locked in the safe! or on your person at all times within the actual move itself! Scary stuff I know!
So I know I wrote a TON... Sorry to be long winded. I just want my thought process to be understood so when you go to make your own you are able to somewhat understand my train of thought!! Any questions PLEASE do not hesitate to comment or email me!
Subscribe to:
Posts (Atom)