Monday, November 28, 2011

I am alive I promise

Talk about a busy time of year for our family! Between school, internship, housework, family, and packing (yes I said packing) I have been one busy mommy! But I am back for yet another great left over recipe and yes you can prepare this the night before or during nap time and have it ready the next day for dinner!

So I don't have step by step directions because silly me forgot to charge my camera battery but you don't need them! This is basically the same as the pot roast only a different cut of meat and left over veggies!

So after Thanksgiving dinner I had lots of roasted green beans and candied carrots left over! I am not a huge fan of leftover veggies. I usually save them in a ziplock in my freezer and just through them in a soup once the bag gets full (GREAT tip btw!!)

So I knew I had some beef tips in the freezer and pair that with some stock and those veggies = YUMMY!

So onto the super simple recipe!

INgredients

beef tips (how ever much you want)
beef stock
1 pkg of lipton mushroom and onion soup mix
left over veggies (I chose green beans and carrots)
1 cut up onion
1 can of cream of mushroom soup (or if you have left over green bean casserole just throw the whole left over casserole in!)


Throw all these ingredients in the crockpot with some salt and pepper and cook for 6-8 hrs on low and yummy beef stew :)) Serve over rice or with left over mashed potatoes!

Simple, Savory and Satisfying!

Friday, October 14, 2011

No fault Pot Roast Recipe

Want to impress your mother in law? or how about a old fashioned gramma??? Betcha never thought a pot roast recipe could be easy? Roasts are hard for some people for one major reason ::: They under cook it!


A roast needs hrs to cook, and I mean HOURS! It is a tough piece of meat that needs low heat for a long period so that the meat and "pieces" that hold it together can break down .. thus making it tender and melt in your mouth!


So I came up with this one 100% on my own.. trial and error... lots of trial and error :))


But I have perfected it and you can prepare it in less the 15 minutes! Best of all you can throw all of this together the night before and just put it on the crock pot in the morning and have the best smelling house on the block by the time you get home from work :)))


Ingredients


A good size roast - I tend to look for one with average fat content.. not too much but the fat holds the flavor so you do need some! 
a bag of carrots (I use the small already peeled ones... saves you TONS of time and financially it isnt that much more)
1 can of beef broth
1 can of green beans... drained and rinsed... or frozen peas or lima beans (trick your family.. yes they will see them but I am telling you they will like them in a whole new way! SO SO SO SO good)
1 can of cream of mushroom soup
1 packet of lipton recipe secret mushroom and onion mix (blue box in pic.. makes it SO much betteR)
1 onion
little bit of butter
salt and pepper
(You can add potatoes to this if you would like... I serve it with mashed potatoes or rice..)


First off... get out your handy cast iron skillet!!!! Get that sucker HOTTTTT


Throw a small (tbsp) of butter in the skillet and grease it up! If it is already good and seasoned then you won't really need the butter.. I use it because this one is fairly new!


Salt and pepper your meat really really well on one side.. 


put it in the skillet (seasoned side down) and do the other side before you flip it!!! You want to hear that sizzle. You are really browning (carmelizing) the meat really well on each side! It really makes a difference!


While the meat is browning.. cut your onion into fourths. 


Take meat out and set it on a plate and it it rest!


Go ahead and put your onion and carrots in to get some color on them as well! (you are NOT looking to "cook" them thoroughly.. just add some color to them)


Put the meat in the bottom of the crock pot


pour the veggies over them (the ones from the skillet and the green beans)


Now the good part! Remove the skillet from the heat source, deglaze the pan by pouring the beef broth in the hot pan and stir up the bits off the bottom with a wisk!


Pour in the packet of Lipton seasoning and stir until incorporated


Pour this mixture over the veggies and meat (DO NOT STIR .. I promise it will all cook in the yummy goodness)


Salt and pepper a little (you will have alot of "salt" from the soup and lipton mix so be a little gentle.. you can always add salt after it is done cooking you can't take it away!)


Cook on low in the crockpot for at least 8 hours!


I like to serve it with mashed potatoes (if I don't add potatoes in the pot) or with rice.. I prefer mashed potatoes!
What? I like GRAVY


Oh and don't forget the bread... you will want that for the gravy :)))


Enjoy!!!


Colder weather =?


Ok so for me colder weather (And for us in GA colder is anything below 90 haha) equals SOUP! Granted I will make a pot of soup anytime of the year but to thoroughly enjoy it you MUST have chilly weather, wool soaks, cozy sweater and a fire in the fireplace... oh well maybe not the later three but you need the chilly weather to understand the healing powers of soup!

So here is my basic rules for soup;;;

1) the longer it sits and "stews" the better
2) pair it with some form of startchy goodness, grilled cheese, crackers, bread etc
3) MAKE A TON, then freeze it in individual baggies so you have it for a quick dinner/lunch or whenever you come down with a cold!

So this is a recipe for my very basic vegetable beef soup. Great for entertaining! Awesome in a bread bowl that can soak up the yummy "broth"  and of course good for the eating... and it freezes well for up to 6 months! Oh and best of all.. CHEAP~ super cheap.. about $15 will serve 8-10 people!

Ingredients :: (just a tid bit.. this is literally whatever you have in your freezer...)

1lb ish of hamburger
1 onion
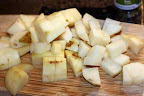
1 lb of potatoes (any kind will do)
1 bag of mixed veggies (a tip on this later to get more bang for your buck!)
1 can beef broth
2 cans tomato sauce
1 bay leaf
1 can diced tomatoes (fire roasted, reg whichever you have)
water
possibly some tomato soup or salsa (more on that later  :)))))


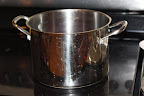
First things first.. gather your ingredients and start opening some cans!


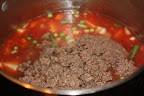
Brown your meat however you desire (draining the grease of course).. i do mine in a pampered chef microwave cooker thing! Works GREAT! contact your local pampered chef rep to order one!!!!!!


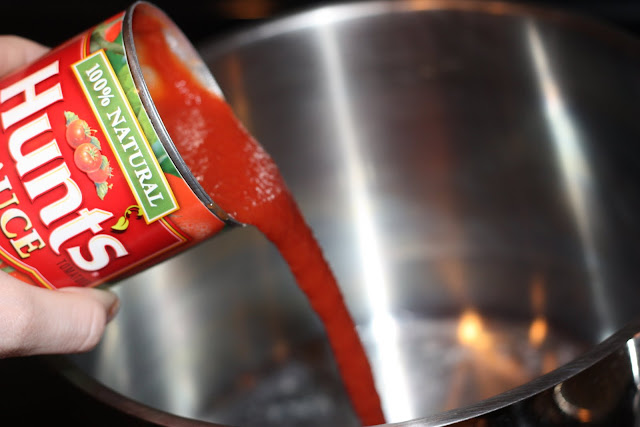
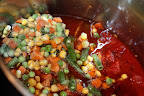
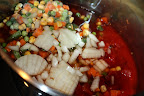
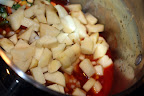
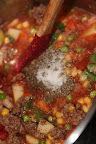
While meat is browning start pouring in your cans of things into a large pot!


tomato sauces & tomatoes

 veggies


beef broth


Now for a quick onion dicing tutorial! Now for anyone who has read this blog before knows I would MUCH rather use my little handy dandy dicer because I will tear up simply at the thought of hand dicing an onion. This recipe sort of calls for a little "chunkier" diced onion then my miniprocessor can spit out so I am forced to face my enemy

So first cut the ends and half the onion.. peel the "layers" off the outside...

lay flat on your cutting board


cut "horizontal" almost to the end without cutting that last little bit all the way


turn onion and dice the other way.. till you get to the end your didn't slice.. then just slice that up too!

it is fairly easy this way but you can do it however you are comfortable.. (sorry for the rough explanation... it is hard to "tell" someone how to do it.. and much easier to show them.. video blog sometime maybe??)

Moving on.. throw that onion into the pot...


Now clean and peel the potatoes (yet again I like to leave some peels on)


Chop into bite size pieces


throw those in the pot too :)


then throw the browned (drained) meat in.


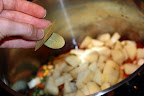
Throw in a good sized bay leaf (or two small like me)


Add some water to bring the level up.. this will mix in a evaporate over the cooking process


Definitely add a good palmful of both salt and better! This can turn a little bland so spice it up a bit!


Now this is where you can jazz it up however you like. My mother loves to add a jar of salsa (which I would have done had I had any on hand!).. it gives it a little something different..


You can try whatever you can think of.. this afterall is just a simple base recipe..

Now you want to simmer this on medium low for about 3-4 hours (or in your crock pot for 6-8)


My favorite way to serve it is with grilled cheese.. which my husband HATES (I know super weird) so I also serve it with some nice crusty bread or saltines! If you have a great bakery near you grab a few bread bowls (or from panera or atlanta bread company).

Enjoy :))

Ps Pot roast to come tomorrow :)))) It is my "famous" super easy NO FAULT recipe! I swear!!!! It is cooking away in my crock pot as we speak and smelling up my house with its yumminess!

Wednesday, October 5, 2011

Update DIY.. semifinished chairs!

so I got my butt in gear and finished these chairs! For about $30 total I was able to redo and completely makeover a mixedmatched diningset!


the only concern I have it the finish. The green is done in a satin finish (which I prefer) but the others are done in a gloss.. the gloss is more comfortable to sit on and easier to keep clean but you just might be able to see your reflection in the glare that comes off of those babies.. so I might invest in a can of each color in satin if I ever come across them! for now they are perfect and brighten up my table :))))

More to come :::::

I promised my potroast recipe and it will be coming soon! Promise!!!!! 
A apple crisp recipe (courtesy of Amanda Stevens) will be in the mix as well!


Wednesday, September 28, 2011

First published DIY??

SO We have had this tiny kitchen table (fitting only 4) since we first got married. I know everyone lived in a "tiny" apartment at some point in their lives and we are NO different! This table is beautiful and given to us as a wedding gift from my wonderful Aunt...but the problem is #1 I LOVE to entertain #2 We live in a much larger house now and #3 We have a minimal budget!....

So in comes a A FREE TABLE, 4 extra free chairs and some elbow grease!

The free table was given to us by a friend who was moving and didn't want it anymore. #1 problem with this.. it was totally the wrong finish and didnt come with any chairs.. SO my creative mind starts turning....

My wonderful grandfather pitched in and redid the table. New coating on the top and some fresh paint and we end up with this ::::


I loved how the table turned out... To some this may look acceptable.. but to me there are a few things going on that I didn't like 

1. there are chairs that dont match in the least.. now this is workable and I could deal but Why not have some fun purposefully making them not match. 

2. This is very dull for a kitchen table. One day I will have a dining room with fancy stuff but for now we are realists.. I have a 2 yr old, an open concept house and I love color.. thus lets have some serious fun!

So I decided I will not paint the darker chairs because I will one day use the other smaller table again (possibly) and I dont want to damage them.. 


So painting the "pine" chairs it is..


So to start off I took some inspiration from these bamboo place mats I got for a buck at Walmart... I know a buck.. CANT BEAT THAT!


So in comes the shopping and elbow grease! I decided to pull the green, blue and orange out.. and since my husband could probably faint at the idea of having a pink chair (I mean come on... only a crazy person would decorate with pink.. haha jk) I will just do a bright red. 

So I decided today to venture out and at least do the green to give it a try.

So supplies ??? 

I decided to go with a more lime green (the muted green was just a  little dull for what I was going for).. the brighter green brought up the vibrancy in the placemats!
I also decided since I didnt want to do a thousand coats I better grab some primer too!
Gloves are a MUST!!!! Let me tell you if you spray paint without them be prepared to have funky colored hands for weeks on end!
And a mask.. just cause I HATE the "high" feeling of inhaling toxic fumes.. might be for some people but not this lady! Oh and I am a little attached to my brain cells.. 


Grab the chair.. set up in a well ventilated area.. and in my case cover the ground and give a clean sturdy area to spray... my husband hates when I kill the grass with spray paint...I mean really.. who wants grass??? I was just thinking of him... less to mow right?  yea we fight over the weirdest things!

Oh and wipe down the chair of any grease, dust or grime... or caked on mac -n - cheese, chocolate, dog slobber, child slobber.. oh the list can go on and on


put on your silly looking mask and glasses!! SAFETY FIRST


Spray the primer first!


It doesn't need to be a super thick coat.. just enough to stick and give a base to the main color!


The spray away at the chair.. nice even strokes... I did two coats here and it turned out GREAT! 


So what do you think??

I will post again when I finish the other chairs! Always a work in progress in this house!~