Sunday, July 31, 2011

Oreo Bars

This is a recipe that absolutely flows with this blog. I took this recipe and adapted it because they just didn't quite turn out how they had them on there. When making their recipe I found that first it called for ALOT of brownie mix and there wasn't really enough cookie on the bottom to hold the oreos together and it made a CRAPLOAD (yes that is a word at least in this household.. is is less then a buttload but more then a reg load) of bars that due to their richness my husband refused to help me eat so naturally being a resourceful wasteless person I just had to figure out a way to eat them!

SO in comes my creative brain... I decided to make the recipe in a smaller pan with less brownie and more cookie and add some marshmellows (to break up the weight of the bar) and some caramel on top.. just because caramel is SO SO SO good!


So here are your ingredients
1 pkg of cookie dough (you can go ahead and make your favorite from scratch but I am SO not normally a baker so I go with the prepackaged stuff)
1 box of brownie mix (pick your favorite kind)
a cup of mini marshmellows
oreos (your favorite kind)
a couple dizzles of caramel sauce
parchment paper lining a 8 x 8 pan

So first make sure the parchment paper fits in the pan and leave enough to go all the way up to the side (this is really a pain in the rear but it makes it SO easy to pull the bars out later)


preheat your oven to 350. Go ahead and prepare the cookie dough to the pkg instructions (or your recipe) and then spread into the bottom of the pan. This step is also a pain and I can promise it will not turn out "perfect" and it will spread out as it cooks so just do your best to spread it evenly.


Top this part with oreos


then sprinkle some of those yummy marshmellows


prepare the brownie mix
top the whole thing with the brownie mix (also a pain but it will also cook out)

Oh my goodness just grab me a spoon now right?
then drizzle some caramel across the top (totally forgot a pic of this... sorry I was drooling way too much)


place in oven for about 45 minutes and you can either a serve these hot with ice cream. They tend to be a little difficult to get out of the pan hot so I usually just wait until they cool really well and then cut them and serve then as actual bars.

I know not the most photogenic (I probably took them out a little early)


Enjoy :)))))

Thursday, July 28, 2011

Melt in Your Mouth Ribs

Ok so this is hands down my easiest recipe... You can of course make it much more complicated but why add steps when easy is so so so good!

So this was pretty much handed down from my mom... it took some experimenting to find my favorite sauce and figuring out how "I" like it best.. my husband would rather have it off the grill but I dont have three hrs to watch ribs slow cook on a grill. So this is a brilliant meal for those moms on the go and the added perk is your house will smell oh so yummy when you get home from work!

Two ingredients (yep only TWO.. and one crock pot)


Grab your trusty crockpot.. I truly believe that a crockpot is a MUST HAVE in the kitchen.. at least in mine we definitely got our $15 out of it a million times over!
Get some yummy pork ribs (you can literally do this with ANY kind of ribs but those pictured were on sale and our usual!

and your favorite BBQ sauce (we like the sweet smokeyness of this kind)


This is the BEST part.. especially for someone like me who ALWAYS forgets to defrost things... throw in your ribs (thawed or frozen) in the crockpot


and slather on a cupish (depending on the amount of ribs) the sauce goes a long long way so don't add too much!) You can totally put all this together the night before throw it in the fridge and then just pop it in the crockpot in the morning!


Turn that sucker on low and let them cook for 8 hrs minimum.... the longer the better!

My favorite is to serve this with white rice, corn (or corn on the cob... oooo garlicy buttery grilled corn on the cob) and lima beans/butter beans... oh and some yummy bbq bread to help slather up the sauce!


Pair all that with some good old sweet tea and napkins and you have yourself a FEAST! PS be careful because there are bones within these ribs and once they cook the meat will separate from the ribs so be sure to pick the bones out before serving!

Tuesday, July 26, 2011

A Bacon-y mess

Tonight's dinner consisted of Meatloaf, green bean casserole, mashed potatoes and some yummy rolls. I wish I had remembered to take a final picture but I was a bit rushed by my hunger pains as a late dinner was attempting to cook! But it was loved by all who ate it and I have a tiny sliver left for lunch tomorrow :)

So here is my thing with meatloaf. It is always given a bad wrap. I was one to always turn my nose away at it. It was always either too runny, too dry, too oniony .. too just yuck...But along comes the wonderful Ree Drummond and introduces bacon into the picture... and I mean add bacon to anything and it immediately sounds better. So it was worth a try and considering it takes the easiest of ingredients and time it works for my book. So I tried it a few weeks ago and even my 13 year old sister in law loved it... So I adapted my version from there..

Now this is why I love naptime and meals such as these. Jaxon napped today for two hrs. I was able to get SO much accomplished including completing these meals and stuffing them in the fridge to put in the over later.. oh and a huge pile of paperwork, phone calls, emails and even some school work.. oh and add in a shower and we are  right on track! did I mention I LOVE naptime!

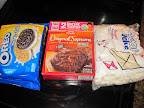
SO I started  with green bean casserole.. I mean it is just so easy and just reminds me of yumminess.. So much better then plain ol green beans..

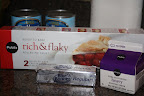
so it is your typical ingredients

2 cans of reduced sodium green beans (try to get reduced sodium anything.. you can control the salt and your life span at the same time!)
1 can lowfat/sodium cream of mushroom soup
3/4 cup of milk (any kind will do.. we happened to have whole)
a good bit of frenchs crispy onion things (sorry brain fart)
pepper to taste
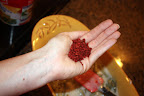
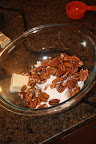
and considering bacon was a big part of the meal, some nice bacon bits!


Add the soup soup  and milk together with pepper too.. stir until combined


add green beans (drained and rinsed) you can add a pinch of salt to this too if you want but not too much)


add a small palm full of bacon bits


Top with crispy onions (complete this step before putting in the oven, if you are just putting this together early and popping it in the fridge the onions will get soggy)

bake for 30ish minutes at 350!

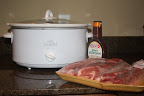
On to the main act!!! MEATLOAF

Ok so this is so super simple you will smack yourself for not ever coming up with this on your own!

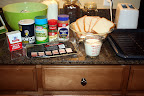
So your ingredients (my version.. to see Ree's version go here)
1 lb ground turkey
1 lb ground beef
4 eggs beaten
1/3 cup of parsley (I like fresh but settle for dried every now and again)
6 pieces of fresh white bread
1 cup of whole milk
1 cup parmesan cheese
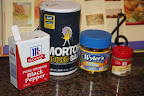
1/4 tsp of season all
1 tsp salt
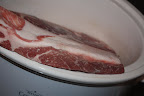
8 strips of bacon (any kind will really do)
pepper to taste ( I do not recommend "tasting" raw meatloaf but I mean if you like pepper pile it on.. if not a pinch will do)


So I add my turkey and ground beef in a zip lock bag and mix it well together... it seems to become one yummy meat that way.


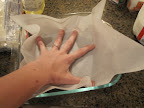
in a separate bowl add the bread in pretty pattern (not really necessary but I like to play with my food) and pour on the milk.. allow to soak thoroughly


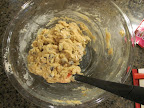
combine ingredients into bowl with milk drunk bread... beaten eggs, meat, parm cheese, salt, other salt, pepper, parsley


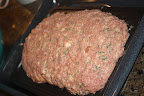
then comes the fun part... take off those rings and dig those hands it.. You CANNOT make a good meatloaf without getting your hands dirty and involved :))))


form into a loaf on a broiler pan (basically a pan that will allow the meatloaf to cook and the fat to drain away.) Then comes the extra yummy part.. wait for it....


fit your slices of bacon across the meatloaf and tuck the edges  underneath.. I am so drooling!


top with your favorite sauce (it can be just plain ketchup)


mine is simply a cupish of ketchup, a good mound of brown sugar and a nice squirt of spicy mustard (like those measurement?) I have also thought of doing BBQ sauce in there but one of my dinner guests has a thing with BBQ sauce.. they are not friends....sad i know :(((((

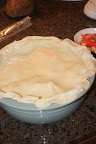
At this point you can simply cover it with foil and place it in the fridge until you need to throw it in the oven.. It is so great to have recipes like this when you have a little one who likes to "help" in the kitchen .. which normally I don't mind but when there is raw meat and hot ovens involved I like him to have other things to do.. ie naptime!


But you place this loaf of meat in the oven at 350 for 1 1/2 to 2 hrs depending on how thick you make it (if you need it to cook quickly make it a thin loaf)


So ok this comes the time within the post that I would normally post the end pictures.. the final product... the finale... in this instance.. I fail... I fail miserably.. no final product photo... no putting it in the oven and miraculously poof I have yumminess... Not the case.. I didn't even get a photo of the plated version.. so sad cause it really is a yummy presentation of a meal...

I served these two dishes with some mashed potatoes and yeast rolls... You can do it with whatever but I find that meatloaf belongs with mashed potatoes. They are best friends.. one is not as good without the other!

Enjoy everyone :) More on my DIY projects to come tomorrow :))))

Monday, July 25, 2011

Taco Salad... or Nachos... a house divided

So this is easily one of the easiest recipes ever and a great recipe to entertain with because it can conform to any picky tastes!


So this is how I do it and you can easily build on it however your family wants.. I will add in some other ideas along with what I do..


Ingredients:
 1 lb meat per 3-4 people (you have hefty eaters narrow that to about 1/2 lb per person).. You can use ground beef, ground turkey or even chicken shredded (great way to use some some left over chicken!)
1 pkg of taco seasoning (whatever is on sale .. they are all basically the same) per lb of meat plus whatever amount of water the pkg calls for!
shredded lettuce (we like romaine hearts cut finely)
shredded mexican cheese
sour cream
 1 can of corn
1 can of black beans (drained and rinsed)
salsa
tortilla chips (our fav are the new multigrain scoops!)
* you can add jalapenos to that or guacamole


Directions:
Prepare the meat (brown beef or turkey or warm the chicken)
add seasoning and water and let thicken on the stove top (if you guys are a tomato family add a can of fire roasted tomatoes .. undrained instead of the water)


go ahead and warm corn in a pot on medium 


add drained and rinsed black beans to a pot and  cover with water


If you are a family who does like all of these three things, corn meat and beans, then just add them all to the same pot (draining the corn and beans though).. but if you are hosting a party separate them so that each individual can pick and chose!
While everything is warming through.. go ahead and throw all the other ingredients in some fun bowls and start to form an assembly line...


The next part is the fun part... assembly! 


Try to keep everything in a bit of an order so people know how to "build" their salads and to keep things moving .. you can go ahead and keep the salsa and the sour cream on the table in case your guests need to add more!


Another tip for a party would be to keep the meat in a crockpot to keep it warm throughout the party so people can munch as the go! (keep the meat on low or "warm" setting on your crockpot!)


Enjoy.. Have fun creating a taco masterpiece!


This is SO one of the easiest things to make for a quick dinner or last minute get together. I enjoy the turkey because the hamburger upsets my tummy... but my husband loves the beef.. So I always make both half a lb of turkey and half a lb of beef and just split the seasoning packet.


And your family is free to call it whatever your heart desires. I fondly remember it as Taco Salad!

Saturday, July 23, 2011

A look into the future

Just a heads up on the weekly menu to come...Oh and some fun DYI projects hopefully to be started tomorrow!

So usually every Thursday during Jaxon's nap time I sit down with pen, paper, coupons, and the new weekly flyers from our local grocery stores (the flyer for Publix comes out on Thursday and Winn Dixie comes out on Wednesday) and I take time to write down and plan out our weekly meals. By planning out the meals there are so many advantages and perks that keep me sane!
1) I can save money by planning meals around the sale items (meats, produce etc) for the week
2) Use some of my stockpile (more on that in another post)
3) I can keep myself from going crazy trying to figure out what's for dinner.
4) premake some meals when I have time and store them in the fridge!


So anyway this week there are lots of fruit on sale and I had tons of chicken and hamburger meat in the freezer that needs to be used. So this week I will be making some of my normal meals but also include some new ones to try out.

Tonight- burgers (turkey and beef) w mac n cheese and fruit salad
Sunday - our traditional Breakfast for dinner.. waffles and bacon!
Monday - Taco Salad, or as Alan says nachos.. This is a huge favorite in my house!
Tuesday - Meatloaf, mashed potatoes and green beans... I will def blog this one! So good! I will also be halfing this recipe and giving a tutorial on downsizing recipes.. can be a little difficult sometimes
Wednesday - Chicken Divan casserole.. this is new to us but looked so good
Thursday- BBQ ribs in the crock pot.. this is a favorite of mine.. w rice and corn on the cob
Friday- cheesy chicken italian... we need to use up some pasta.. this will do it!

So keep up with the blog this week (and maybe tonight to show you the best turkey burger ever!)

And some awesome DIY things to come.. A recycled herb bench.. and a menu board for FREE out of scrap lumbar and some left over paint!

Tuesday, July 19, 2011

it is always a good time for some firsts...

So today I figured why not try a few new recipes... I had tried to make Chicken Pot Pie before (epic fail .. the "gravy" was more like water). But after some research and a good started recipe in the good ol' Pioneer Woman cookbook.. I have it all figured out


Oh and BIG tip.. you can prepare BOTH of these recipes ahead of time (ie nap time.. after bedtime the night before) and just refrigerate until you can pop them in the oven.. both of these I prepared in about 20-30 minutes while my son played with his friends!


First start with :::::
3 stalks of celery
3 whole carrots peeled (or a half of a bag of these carrot stick things)
1 cup frozen peas
1 yellow onion
1 pie crust (I cheated and bought the store kind..)
1 stick of butter (really only need a half of it though)
1 cup (or  8oz) of heavy cream
2 cups of chicken stock (low sodium please!)
1 tsp salt
1 chicken bouillon cube
1 tsp thyme
pepper to taste
1/2 cup of all purpose flour (sorry forgot to photograph)


'
1 whole chicken cut up into bite size pieces : I usually just use chicken breast or cheat and use a store bought rotissaire chicken... you could also be super old fashioned and just make your own chicken broth with the whole chicken and spend all day in the chicken etc... but I have too much other fun things to do!


So gather all these ingredients..... AND one of these::::

A small food dicer.... SO handy... 


If you do not have one of these go to target and buy one for $10.. best $10 you will have ever spent.. you must have one of these for this recipe.... Well I lied.. not really but you can use that excuse for your husband! 

So once ingredients are all out.. prepare veggies (ie wash and dice into bigger pieces)...

 put a pot, skillet whatever onto the stove on medium high and melt 1/2 stick of butter ...
Go ahead and use that little handy food dicer...

Oh and use your best friend in the kitchen... 

A garbage bowl.. I got this tip from Rachael Ray. Instead of walking back and forth to the trash can or the sink with your scraps and trash.. or tripping over the trashcan while it sits beside you while you peel carrots.. simply take a big bowl and deem it your GB, Garbage bowl.. Saves lots of steps and hassle! You will fall in love quick!

So take all those diced veggies and toss them into your melted butter pan
So pretty all those bright colors :)  Go ahead and let them cook for a few minutes, stirring slightly until the veggies start to get translucent then add the chicken bites 

let that cook for a few more minutes to let the chicken brown and warm a little.. 

Add the flour and constantly stir the flour in to let it cook out a little (forgot to photography step.. sorry new at this!)

then add the chicken broth and bouillon cube. stir stir stir (the flour will thicken the stock into a nice gravy)
please ignore my lack of manicure.. true sign of a real homecook

Go ahead and add the cream and peas... remember to stir in the cream to not scald it.. turn the pan on low and let it simmer and thicken a little


by now your kitchen should smell of yummy pot pie filling!

Now take a fun colored deep casserole dish

It MUST be colored and pretty for this dish.. Just kidding.. but it does need to be a deep round pie dish or casserole pan but you can use this for yet another reason to go to Ross and grab a fun kitchen item.. you can tell your hubby the recipe  maker said so!...   Anyway so on...

Add "filling" to the bowl.. sorry missed photo op yet again

Top the casserole dish with the handmade (ahhh store bought) pie crust and pinch to the side


Make sure you cut slits in the top to allow the steam to escape!
Bake at 350 for 30 minutes or until the crust is nice a brown!


And yes it was SO SO yummy! Perfect after a long day of playing or a long evening on a golf course...

Onto a  yummy side.. In all reality you could just go ahead and serve the pot pie alone but I have been dying to make a sweet potatoe casserole on my own. It was my favorite thing ever made while living in NC and I finally found a recipe that sounds similar to Mrs. Helens... So... Here we go::::
 PS I skipped the whole ingredients shot before putting the sweet potatoes in the oven to bake.. too hard to remember


So you will need 3 cups (or a few good sized sweet potatoes) already baked and yummy.. I really could just eat these on their own but I must refrain.. though I need make a few extra for our enjoyment for later....


let the cooked SP (sweet potatoes.. sorry my fingers get all jumbled spelling out "P O T A T O E S" ) cool then peel and plop in a bowl for mixing!
just gimmee a fork now please!


Grab the rest of your ingredients


2 eggs stirred
1/2 stick melted butter
1/2 stick room temperature butter
1/2 cup of milk (sorry added too much in the measurer)
1/2 cup of brown sugar
1 cup of pecans
 1/2 cup of sugar
1 tsp vanilla extract
1/2 tsp salt
1/3 cup all purpose flour


Combine eggs, melted putter, milk, sugar, salt, and vanilla in the bowl with the SP's and mix with a hand mixer till well incorporated...  add to yet another fun casserole dish... any shape is fine.. just something oven safe :)


For the topping... Add the pecans, flour, brown sugar and the room temperature butter into a small bowl and combine well. 

go ahead spread ontop of the SP mixture...


I like to add a few more bits of butter on top.. butter = flavor


bake at 325 for 30 minutes

I went ahead and put these two recipes in together and just left the temp lower!


Comes out SO SO SO yummy